|
|||||||


 |
|
|
Thread Tools | Display Modes |
|
|||||||
|
|
|
Thread Tools | Display Modes |
 10-20-2010, 08:49 PM
|
#31 |
|
AEM EMS
Join Date: Jul 2006
Location: UK
Posts: 891
 |
offset is 37 and 60.1 is the bore, belive me.
|

|

|
|
10-20-2010, 09:03 PM
|
#32 |
|
3" Exhaust
Join Date: Sep 2010
Location: NH
Posts: 86
|
Sorry, I am sure that you're right. Throwing a few terms in there I didn't really know too well. Bore and offset, believe Bill UK's numbers all.
__________________
88 Supra 7M-GTE Turbo, TEMS, Targa stock |
|
|
|
|
10-25-2010, 12:50 AM
|
#33 |
|
3" Exhaust
Join Date: Sep 2010
Location: NH
Posts: 86
|
Well, after a few hours I was able to spin the crank by hand, and then I took out the #1 spark plug to have less compression to make it easier to spin to TDC on #1 cylinder. Finally removed CPS, was quite easy, No, do not remove all the air lines the TSRM tells you to, there's no need except for a small tiny one, not the 2 huge ones. And ditto on the PS reservoir, I removed the holding bracket, and then shoved it over to a side, and without too much wiggling got the CPS off the head. Hmm, it's interesting, with the water housing also now removed, there's a lot more clearance to root around. Still hard to tell but the metal cooling line that runs next to the block and heads to the back of the engine under the exhaust headers and heat shields looks ok, at least the small portion I can see, and after all that's the area where the leak is. The upper stud on the CPS mount has some built up gunk on it, looks like coolant that has been exposed to air, so could that be the smoking gun here? The gasket was sort of ok, I mean it split into two parts on removal like they all do, and I've certainly seen worse. So I can't figure if the 90 hose, the water housing outlet gasket was the source of evil.
So, so far so good. Except that with the water housing outlet now off, I benched it and drilled it in a wood vise to deal with that p.o.s. thermostat housing bolt that snapped off in it. I had to drill and drill and drill more and the stupid thing still won't let go, the hole I drilled actually went past the bolt end into the housing a little I think. Not all the way through wall I think. But it's a big mess, and I don't quite know what I am going to do. Can I helicoil this now? Should I just re-mount it with only the upper bolt holding in the thermostat to this housing? (don't really trust that and want to do that). The exit out the bottom of the water outlet housing is an oily mess. I have various small oil leaks and I assume it's oil and crud, but could that wet area be the leak where it starts to join that 90 angle small hose? If it's bad, do I replace it with some sort of like a plumber's thread with a new part? (not really experienced in this). I also found it looks like a very small return coolant line from the turbo just underneath all this and I think I'll replace it as a precaution and the lower rad. hose since it's all very easy to get at now. Any thoughts on how to deal with the broken bolt junk that won't come out? And one more thing, the TSRM is confusing me. I have a replacement O ring gasket for the CPS. The diagram makes it look like it's the first thing to come off on the end of the CPS spline. Then on my CPS unit, there is no gasket ring at that spot or left in the head. There is a similar shaped thingee after the two gears in front of it, both of which then I'd have to remove. (meaning the TSRM diagram is wrong) And what??? Do I have to grind down something to get those two gears off to replace the o ring gasket like it says in Ignition chapter P 21-24? Anyone chime in on that one? the pic shows the lower bolt housing that's all shot to hell from drilling and still lodged in there. There is white tape over the normal outlet opening to keep the shavings out above it. Thanks
__________________
88 Supra 7M-GTE Turbo, TEMS, Targa stock Last edited by rjSupra; 10-25-2010 at 03:20 AM. Reason: added pic and descript, mis spelling |
|
|
|
|
10-25-2010, 12:06 PM
|
#34 |
|
AEM EMS
Join Date: Jul 2006
Location: UK
Posts: 891
|
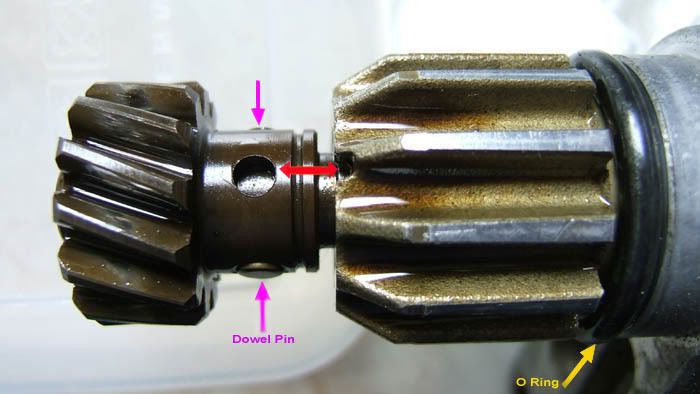
You only need to slip the new O ring to the position in pic below with out removing any other parts. Im at work at the moment so I dont have time to access to the TSRM, but I think grinding the pin off etc is part of the process for replacing the bearing.
|
|
|
|
|
10-25-2010, 12:14 PM
|
#35 |
|
AEM EMS
Join Date: Jul 2006
Location: UK
Posts: 891
|
By the way, the large looking gear where the O ring sits, has been designed that way to reduce the surface area, which makes it easier to remove/replace from the head and serves no other purpose, unlike the gear on the end.
|
|
|
|
|
10-25-2010, 03:24 PM
|
#36 |
|
3" Exhaust
Join Date: Sep 2010
Location: NH
Posts: 86
|
Oh, interesting. I thought they were two working gears. Thanks again for the assistance. So, maybe silly Q, but can I just yank the old one out and stretch the new one around everything, or do I have to remove the gear in the front and that slotted piece first to replace it?
__________________
88 Supra 7M-GTE Turbo, TEMS, Targa stock |
|
|
|
|
10-25-2010, 05:35 PM
|
#37 |
|
Super Moderator
Join Date: May 2007
Location: Billings, Montana
Posts: 1,034
|
get the old one off and just slide the new one into place by slipping it over the gears
__________________
1989 7MGTE R154 Targa Top White Package w/Blue Interior Driftmotion 57trim CT26, Upgraded Intercooler, 2.25" Hard Pipes, 3" Turbo Back Exhaust with Test Pipe, HKS VPC w/GM 3 bar MAP sensor, APEXi S-AFC, Walbro 255lph fuel pump, ProSport EVO Series Boost / Fuel Pressure / AFR gauges, Lotek a Pillar Gauge Pod, HKS Type 0 Turbo Timer, Eibach Lowering Springs, Tokico Illumina II TEMS struts, custom powder coated Motegi Racing TrakLite wheels |
|
|
|
|
10-25-2010, 07:21 PM
|
#38 |
|
AEM EMS
Join Date: Jul 2006
Location: UK
Posts: 891
|
Yep ! as btwilson86 said,
|
|
|
|
|
10-25-2010, 07:31 PM
|
#39 |
|
3" Exhaust
Join Date: Sep 2010
Location: NH
Posts: 86
|
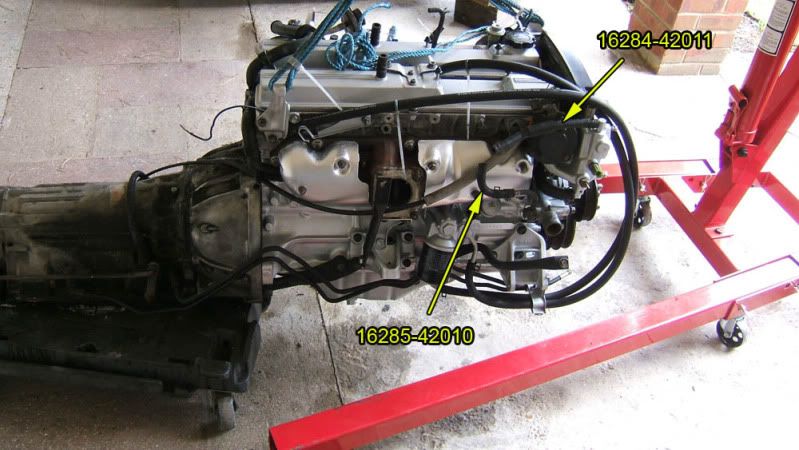
Thanks guys, will get right on that, sounds easy for once. Even finding a lower rad hose seems too much for local suppliers. Seems I have to special order it 2 day in. Also there is very short 5" or so skinny diameter black hose that looks to be some sort of return from the turbo. It mates right into the back side of where the lower rad hose meets the block. EDIT: I think this might be the 16285 Toy part / Gates 18030?? What is this hose and what do I look for for a replacement? Think it's wise to do since it's so easy to reach, and the metal lines it connects looks a little coolant oxides sludgy around it, so I want to do this while it's out. I am fearful of bunging up the water outlet housing even worse than it is by trying tap and die it with a tap. My friend said I could go with:
"You could substitute a 1/4-20 for the M6, but you'd need to find a 1/4 bolt, which is slightly larger (.25 vs. .236), making your mating part clearance hole situation slightly worse. Also, you'd have different sizes on the two. Not a huge deal, but not "right". To do this, you may still have to helicoil it, but you could try it first without doing so. Take a .201 (#7) drill and drill out the hole (again, be careful not to poke through...tape on the drill shank at a safe max usually works). Then tap it 1/4-20 using the procedure I mentioned prior. Then find a 1/4-20 bolt the right length, and put it back together. If the threads are not strong enough because of the prior drilling efforts, you can still helicoil it, maybe even for an M6." I don't have the right tap for the M6 x 1.5 original bolt, nor does one store, but I do have the 1/4-20 ta on hand. Sound like an ok plan of attack on what's holding up my reassembly?
__________________
88 Supra 7M-GTE Turbo, TEMS, Targa stock Last edited by rjSupra; 10-25-2010 at 07:36 PM. |
|
|
|
|
10-25-2010, 09:48 PM
|
#40 |
|
AEM EMS
Join Date: Jul 2006
Location: UK
Posts: 891
|
By the sound of things your friend has mechanical background, I would go with what he/she has suggested; Ebay is a good place for the odd size nuts/bolts and taps. The hose youre referring to is Toyota # 16285-42010 not sure if its the return or feed. The other coolant hose from the turbo connects to the top of the thermostat housing as you know.
|
|
|
|
|
| Tags |
| at oil coolant line burst, auto transmission lines, coolant loss, overheat, radiator |
|
|
 Linear Mode

