 09-20-2010, 10:57 PM
|
#1 |
|
Stock
Join Date: Sep 2010
Location: Tulsa, Ok
Posts: 22
 |
Hola Peeps!
Since I am becoming a part of this forum, the least I can do is try to contribute. I set up and ran detailing shops for several years, and I still spin a pad on occasion. I'll be posting some "how-to's" and other information for buffing, oversprays, interior stains and general detailing, and I'll be happy to assist with any questions should they arise. To show some examples, I'll be posting pics of the wife's new toy, the 87 Supra in my shop. |

|

|
|
09-27-2010, 08:21 PM
|
#2 |
|
Stock
Join Date: Jun 2010
Location: Twin Cities, MN
Posts: 22
|
Sounds great Jack! Thanks for giving back to the community! Cant wait to read your stuff!!

|
|
|
|
|
09-28-2010, 03:25 AM
|
#3 |
|
Stock
Join Date: Sep 2010
Location: Tulsa, Ok
Posts: 22
|
Let’s start things off from scratch with the products that work best…sort of Detailing 101. I know most people don’t have access to a detail supply warehouse for professional grade products, so we’ll stick to things you can find at your local auto parts store or Walmart. If you know what you’re looking for, you can still get outstanding results without going broke to do it. Let’s begin with our first product, Castrol Super Clean.
 This is what it looks like for those who don't know. For general detail cleaning, I buy this by the gallon and cut it 50/50 with water in quart-sized spray bottles. Pros: Works as well as higher priced degreasers for about $7.00-8.00 per gallon Readily available, check your walmart vs parts stores for best price. Cons: It’s a degreaser, so it’s caustic. Don’t leave it on polished aluminum surfaces for extended periods of time, and keep it off your finished body paint. Step 1. Pre-wash: Take your spray bottle with you to your local self serve carwash. (unless you have a power washer) Spray wheels, tires, and fenderwells just enough to get them wet. Set the wand to soap, and clean them all. You’ll be surprised how much crap you can get out of fenderwells, so don’t be afraid to get in there. After cleaning them all set the wand to rinse and repeat the process, making sure to thoroughly rinse the surrounding body panels as you don’t want degreaser left on them. If you’re cleaning the engine compartment, hit that as well, but make sure to leave the engine running. Nothing worse than drowning the car so it won’t start. That said, don’t spray anymore around ignition components or air intakes than you have to. Can't bring up wheels and tires without touching on wheel acid. Plenty of brands out there, basically all about the same. I've always used pro grade products for this, cut 50/50 with water. If you have alloy wheels be very very careful using these products. You can ruin a set of expensive wheels in less than a minute's time...I'm not kidding. Wet the wheel (work one at a time) and spray it evenly, do a normal paced 10 count, then rinse thoroughly. Repeat as needed. Step 2. Hand Washing: Hand washing is the best way to clean your car, while doing the least amount of paint damage. Those “no touch” car washes are simply relying on a higher concentrate of butyl chemicals in the soap mix to eat the road film and dirt off your car, and it’s taking the wax with it. This brings us to product number 2. Blue Coral Wash Soap  Here's your reference photo... There are dozens of wash soaps available, and Blue Coral is one of the best. Maguiar's is also good. The butyl chemicals are not too harsh, and there are no bullshit additives you don’t need. (polymer or silicon wax) It has a good foaming agent, and rinse agent…so it’s easy to get off when you put the hose to it. Put just enough wash soap in the bucket to cover the bottom, and fill it with water. Using a sheepskin wash mitt will do the best job of washing the car, while taking off the least amount of wax. Start in the same place on the car every time and move in the same direction…I personally start at the left rear body panel and go clockwise. This keeps you from missing spots that you’ll have to come back to. Wet the car first, then start washing. Keep your mitt wet and keep it moving…don’t be stingy with the soap and water, since you ARE trying to clean it. Move with the body lines of the car, and overlap your strokes twice. Yes, I realize it sounds like a bit much, but I can’t tell you how many times I’ve heard, “I know how to wash a car” and they never get it clean. Using these methods, I can wash over 25 cars an hour and never skip anything. Step 3. Drying: If you use a chamois to dry, buy the artificial variety. The natural chamois will mildew and rot, and it also strips more wax off. Personally, I use a leaf blower. It’s not only faster than a rubdown, but it also gets water out of rear view mirrors and trim mouldings where it likes to linger. Next post, we'll take the car in the shop and get to work on the exterior... Any questions, let me know Last edited by Jackalope501; 09-28-2010 at 03:38 AM. |
|
|
|
|
11-15-2010, 03:35 AM
|
#4 |
|
3" Exhaust
Join Date: Oct 2010
Location: walhalla, sc
Posts: 83
|
Hello Jack, i have recently worked in a detail shop and i have a Q about clear coat. The clear coat on my 89 has faded off on my front and rear bumper and thats the only place i have a problem with figured it was just a water base primer or lack of waxing from the previous owner. I was wondering if there is something that i can use to prevent this in the future.
__________________
1989 na turbo supra ~ 3ARacing exhaust 2.5" pipe no resinator, sports package |
|
|
|
|
11-15-2010, 01:24 PM
|
#5 |
|
Stock
Join Date: Sep 2010
Location: Tulsa, Ok
Posts: 22
|
Good timing killa, I just got back yesterday. Wife's mom was having surgery over in Europe, so I've been gone a bit. I'll get on the rest of the detail stuff later today.
Now, for the clearcoat problem: You could be right on both accounts. Nothing protects your finish like regular quality waxing, but if the paint/clearcoat was applied poorly then it's only a matter of time... I'm lucky here, I have access to some very good touch-up guys. No, not the kind that use the little bottles with nail polish brushes, I mean real painters. Contact your high-end dealers locally, because somebody knows a similar crew in your area. Last time I did it, we had a Mustang GT that had been scrubbed over so many parking lot twinkies you could see a lot of rubbermaid yellow on the bottom of the nose cap. They blended it so well, you couldn't find it afterward, for about $75.oo USD. That's extremely affordable if you care about your car, right? Afterwards, keep a quality carnuba wax on it for maximum longevity. Let me know if this helps... I'll get into exterior finishing later today... |
|
|
|
|
11-16-2010, 01:54 AM
|
#6 |
|
Stock
Join Date: Sep 2010
Location: Tulsa, Ok
Posts: 22
|
Now that the car is clean and dry, let's take it inside to do our exterior work.
You NEVER want to wax or buff hot paint period. Fenderwells: How many times have you seen a car all buffed out, wheels shined up and tires dressed out only to have nasty dirty fenderwells? I promise youll recognize it now. This is the cheapest way to take 10 years off the appearance of your car, and most people never touch it. Back at Walmart, pick up a few cans of ColorPlace Flat Black spray paint. Dont worry, its only about .95 cents a can. I know what youre thinking why not gloss paint? Trust me, flat is best for this application. Go into your fenderwells with your spray paint and get to it. Get a coat on everything in there that should be black. You can pull a tire if you need to, but usually turning the wheels to one side or the other is sufficient to cover it. You dont need to go too heavy no need for paint drooling onto your garage floor, just get it black. If youre worried about getting something on the surrounding body, just put a bit of paste wax on the fenders about 4 inches out. (Spray paint wont get through the wax to the body, you can just wipe it off after.) Once youve painted them all, hit it with some tire shine and leave it. For this purpose, I recommend No Touch Tire Care. Heres what it looks like:  I use this product because it doesn't leave that snotty, greasy look on your tires. Black with a low sheen finish always looks better, unless you're 19 and stupid. Taking the time to hit your fenderwells is essential for a truly clean appearance. Take the time to treat the exposed areas of your frame and suspension as well, just like we did the fenderwells. You'll typically only need to do this about once a year. This makes a huge difference, try it and see for yourself. Last edited by Jackalope501; 11-16-2010 at 02:01 AM. |
|
|
|
|
11-16-2010, 02:14 AM
|
#7 |
|
Stock
Join Date: Sep 2010
Location: Tulsa, Ok
Posts: 22
|
Waxing:
NEVER WAX OR BUFF HOT PAINT...PERIOD! I could give you a plethera of horror stories here...suffice it to say you don't need to apply half a can of wax and leave it on your car for 3 days. Yes, I've actually seen it done.... Stay away from any products made by Simoniz or TurtleWax. You'd be better off pissing on the paint after you wash it. They are full of gorilla snot (silicone) and other additives that do no good for your car. The same goes for Colorback 2000, and all those other "once a year" products. If you care about your car so little, call me and I'll come get it... Here's what I recommend, Malco Imperial Paste Wax:  Simply the best product I've ever used for waxing a car. You may have to go online to buy it, and it costs a bit more per can, but this one can of wax will last you 10 years with your personal car. Yes, I know I said these were products that you could buy almost anywhere, but the fact is nothing on the store shelf comes close. Application: Keep a small container full of warm water. About the size of a coffee can should do. Wet your applicator by submerging it and squeezing 2-3 times, pull it out of the water and squeeze it twice. Now you're ready to apply the wax. After each body panel or two, re-wet and re-squeeze it for best results. Start in the same place on the car every time, and go in the same direction. Swipe the applicator in the wax, and wipe it on the paint in a straight side to side manner. One swipe through the wax should get you a body panel or two...it doesn't take much. Follow the body lines of the car to keep from skipping spots. Once you've made it all the way around, remove the wax with very soft terrycloth or microfiber towels. If it's your first time with this wax, repeat the process a second time...wax on, wax off. The Malco Imperial wax should last you a month or two, depending on how much you wash the car. It won't build up on your paint even if you use it every week. Feel free to use it on your chrome and your exterior windows too. Tomorrow, we're gonna start buffing.... Last edited by Jackalope501; 11-16-2010 at 02:34 AM. |
|
|
|
|
11-16-2010, 04:10 AM
|
#8 |
|
3" Exhaust
Join Date: Oct 2010
Location: kansas
Posts: 166
|
 more , more . Yesss this is like a porn movie lol , the more you see the more you want it!!! lol THANKS MAN !!!!!! more , more . Yesss this is like a porn movie lol , the more you see the more you want it!!! lol THANKS MAN !!!!!!
__________________
Nice 87 Supra, Pearl white, targa top, 5 spd, 7mgte  ARMY STRONG !! La fiebre Boricua Puerto Rico!!! 
|
|
|
|
|
11-17-2010, 04:59 AM
|
#9 |
|
Stock
Join Date: Sep 2010
Location: Tulsa, Ok
Posts: 22
|
Thanks Fantasma...love the enthusiasm.
Buffing: This is the most complex part of auto care, period. To give it it's due attention, this will probably require multiple posts over the next few days, so please bear with me. Machine buffing can make a dramatic difference in your paint's appearance, both good and bad. If this is your first time handling a buffer, I strongly suggest you attempt glazing first which I'll cover as we go along here. So let's get started with equipment first. Tools you will need: First off you will need a buffer, so let's talk about brands and features. The buffer you want to use is a variable speed model like the Makita shown below with a white foam pad attached. This is a glazing pad, more on that later...  Makita makes a good buffer. It's relatively light-weight, so it's easier to handle than say a Milwaukee, shown here wearing a white wool pad. This is a cutting pad. 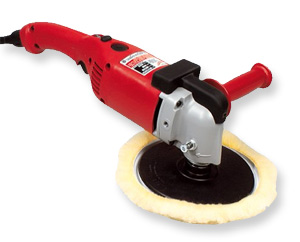 What's the difference? Price for one. The Makita can be picked up for around $200 USD, while the Milwaukee will run $300+. Weight is also a factor. The Makita comes in at about 6.5 pounds, while the Milwaukee tips the scales at a hefty 9 pounds. This may not sound like a lot, but believe me it will beat your ass over the course of a day. Now don't get me wrong, I own a Milwaukee myself...it's the buffer I learned on many years ago, and it's a tough machine to beat. It's an extremely reliable bullet-proof piece of equipment, and the extra weight is a plus when you have to do heavy compounding jobs. The Makita motor produces about 10 amps, while the Milwaukee runs a wrist snapping 12 amp motor. The Milwaukee is probably the most common machine among professionals, but you're not likely to see one in the detail shop at your local auto dealer. There's a couple of reasons for this...first, I said it was common among professionals, not the lot porters you find spinning pads at a dealership. Most importantly, it's a theft issue. High-end Milwaukee buffers have the best resale value in their class, so a lot of them found their way into pawn shops. (Good place to buy one) For this reason, you'll find lower end equipment in dealer's shops. Here's a good example made by Chicago tools:  This machine retails for about $30-40 USD, so you can see why dealers buy them for their shops. It claims a 10 amp motor, but it's no Makita. It does feature variable speed, but it takes a while to spool up to 3000 rpm...trust me, I have one. Why? It's a good lower speed buffer for glazing at 1800 rpm. If you're a first time buffer, buy the Chicago. If you'll only buff one car in your life, buy the Chicago. If you're looking for a glazing machine to keep on hand so you don't have to keep swapping out heads and pads, buy the Chicago. It won't break your budget...at this price, you can afford to keep it on the shelf for 10 years. It's got enough power to buff a car, but not enough to get you into trouble like the Milwaukee. Oh, and before I forget....  For purposes of this discussion, this IS NOT a buffer. This is a plastic child's toy, and you can do a better job by hand. Don't waste your money. Last edited by Jackalope501; 11-17-2010 at 05:50 AM. |
|
|
|
|
11-17-2010, 05:47 AM
|
#10 |
|
Stock
Join Date: Sep 2010
Location: Tulsa, Ok
Posts: 22
|
Let's move on to pad selection...
There are several varieties available, but we'll start by breaking it down into two groups. Wool and foam pads. Wool Pads: These are agressive cutting pads. You will hear me use the terms "hard" or "soft" pads. This refers to their cutting power, or abrasive levels. How do you tell the difference? By color. Your most aggressive pad is a white wool pad, shown here with a velcro backing.  This is your most common form of attachment. You will use a 7" rubber backing plate on your machine with the male side of the velcro. These typically come with a new machine. The female velcro side will be on the back of the pad itself. That's hook and loop fastener for you military types. Your white wool pad gives you your best cutting power. That means it removes more oxidation and scratches. For most applications, this is where you start. This is also the pad you will use with heavier compounds. Next is your yellow wool pad, shown here. 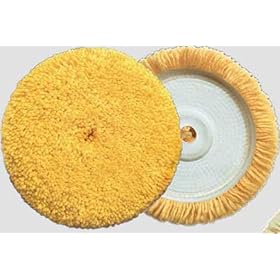 This is a softer wool blend, used as a finish pad. Simply put, this shines more than a white pad does when used with the same products. So let's review...White pad = cut...Yellow pad = shine Here's a typical kit from buff and shine...probably the best pads you can buy.  This kit comes with a white wool pad, yellow wool pad, a black foam pad and the backing plate for all 3. At $32.oo USD, it's a bargain. I'll add the link here for anybody shopping. http://www.tooltopia.com/buff-and-sh...n=shopzilla_r1 Last edited by Jackalope501; 11-17-2010 at 06:32 AM. |
|
|
|
 |
|
|
 Similar Threads
|
||||
| Thread | Thread Starter | Forum | Replies | Last Post |
| Current Ride, Mustang 5.0 | cageceo | Show n Tell | 28 | 08-10-2007 08:15 PM |
| Car Paint Maintenance, and cleaning. | cageceo | Exterior , Interior, and Detailing | 1 | 08-09-2007 05:43 AM |


 Linear Mode

