 03-18-2009, 09:52 PM
|
#11 |
|
Intake
Join Date: Oct 2008
Location: New Jersey
Posts: 36
 |
Bill
That's excellent, and much easier than I was thinking! Tomorrow I'll get a couple metric bolts and thread them into the holes on my crank pulley, and measure across them. Seems like one could measure across the bolts outside-outside and subtract, or inside-inside and add, the bolt diameter. If the drilled holes are a little oversize I don't think it would matter. Probably need a tap also, as those holes are probably pretty crusty and need to be chased first. There's an industrial supply nearby that carries metric fasteners. My knowledge of metric fasteners is pretty shaky, I guess you're saying there are there different pitches? I'll go thru what bolts I've removed so far and see if anything matches. I'll let you know if I find the right bolts. Thanks! Paul |

|

|
|
03-18-2009, 10:32 PM
|
#12 |
|
AEM EMS
Join Date: Jul 2006
Location: UK
Posts: 891
|
Sorry when I said pitch, I was referring to the hole location. The thread pitch I would guess is a bog standard 8mm metric, what ever that is. Although the UK went metric many years ago, I still think in imperial, Whitworth, BSP, BA, BSF are all threads with fond memories of the past when working in a machine shop. Jugging by the method you are going to calculate the hole positions, I would guess that you have some sort of mechanical experience or is that just commonsense.
|
|
|
|
|
03-19-2009, 03:37 AM
|
#13 |
|
Intake
Join Date: Oct 2008
Location: New Jersey
Posts: 36
|
Bill
I just looked up 8 mm threads, and they are either coarse (M8x1.25) or fine (M8x1). In non-metric terms, the coarse is about 20 threads per inch, and the fine is about 25 1/2 threads per inch. I think I can decide which using a U.S. 1/4-20 bolt. I'll let you know if I figure something out tomorrow. Geez, I had two people ask me today why I was spending so much time messing around with that old Toyota. The nerve! All of those British sizes always mystified me. Of course I never could figure out pounds and shillings, and quid, and farthings, and crowns, and all of that either. I have a good friend in Ulverston, up in the Lake District, and used to take my kids over there every couple of years. Beautiful country. I just have a lot of unrelated information tucked away, I guess, which only once in a good while has some practical application. I worked as an engineer for alot of years in oil refineries and gas plants though, where you're always trying to figure the simplest way to do something. After looking at your images more closely I realized I don't see how the long square rod holds the ring without getting in the way of the socket passing thru the center of the ring to the nut. |
|
|
|
|
03-19-2009, 04:42 PM
|
#14 |
|
Intake
Join Date: Oct 2008
Location: New Jersey
Posts: 36
|
I've been studying the timing belt removal procedure in the TSM, and it seems like they remove the belt, then cam timing gears, then they reinstall the gears, and finally put the new belt on. Why remove the gears at all? Is it just to replace the seals? If the seals are OK, seems like it would be a lot easier to just switch belts.
I've got everything stripped down to the crank pulley, but I can't budge it with a long breaker bar, even without "blocking" the pulley. Thought I'd try the easiest way before making up a SST. Car's in 5th with the emergency brake on . . . and it's not moving yet. Maybe need to start dosing with penetrating oil and try again. Starting to wonder again about making the other repairs and forgetting about changing the timing belt. Advice would be welcomed. |
|
|
|
|
03-19-2009, 05:21 PM
|
#15 |
|
Super Moderator
Join Date: May 2007
Location: Billings, Montana
Posts: 1,034
|
All belts stretch over time, which is why they have scheduled intervals to change them. Seeing as how you're at 130,000 miles on the original belt, I'd say you should change it. If you're not getting it to budge with a long breaker bar, then you probably should soak it liberally with some penetrating fluid. Maybe you can try using the "starter bump" method next time you try to get it off. I've never removed mine, so unfortunately I can't offer you any real help in removing it.
Oh, and make sure you replace your tensioner with your belt
__________________
1989 7MGTE R154 Targa Top White Package w/Blue Interior Driftmotion 57trim CT26, Upgraded Intercooler, 2.25" Hard Pipes, 3" Turbo Back Exhaust with Test Pipe, HKS VPC w/GM 3 bar MAP sensor, APEXi S-AFC, Walbro 255lph fuel pump, ProSport EVO Series Boost / Fuel Pressure / AFR gauges, Lotek a Pillar Gauge Pod, HKS Type 0 Turbo Timer, Eibach Lowering Springs, Tokico Illumina II TEMS struts, custom powder coated Motegi Racing TrakLite wheels |
|
|
|
|
03-19-2009, 05:42 PM
|
#16 |
|
Intake
Join Date: Oct 2008
Location: New Jersey
Posts: 36
|
BT: Thanks. I'll start soaking it with Kroil . . . that's the best stuff I've found. I keep telling myself I've gotten this far . . . Just needed some encouragement I guess.
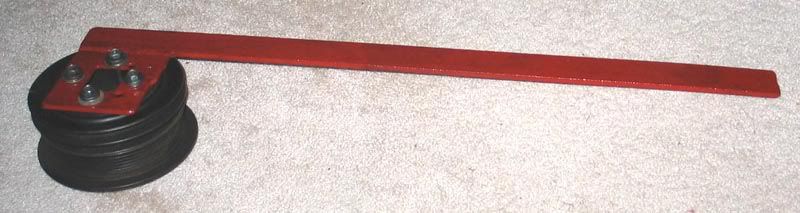
Bill: I've been thinking about the easiest way to make an SST. Perhaps an even simpler technique than the doughnut scheme might be a square steel plate, maybe 1/4 or 3/8 inch thick, maybe 6 inches square . . . or any size larger than the diameter of the crank pulley. Drill 5 holes . . . one in the center large enough to pass a 19mm socket, and 4 more to pass 8mm bolts to thread into the pulley. The plate sits on the outside of the pulley rather than down inside. After bolting it up, stack up some short but heavy blocks of wood, maybe on top of a concrete block . . . between the floor and one flat of the square plate. May have to jam in a shim to tighten the stack up. But that should hold it. You'd have to lift the car for it to slip. Long as the 8mm bolts don't break. But using all four threaded holes should help. What do you think? The threaded holes in my pulley are rusty and full of dirt. Definitely need cleaning and chasing. I'm going to see if i can find one each of M8x1 and m8x1.25 bolts to find out what we've got. |
|
|
|
|
03-19-2009, 07:53 PM
|
#17 |
|
AEM EMS
Join Date: Jul 2006
Location: UK
Posts: 891
|
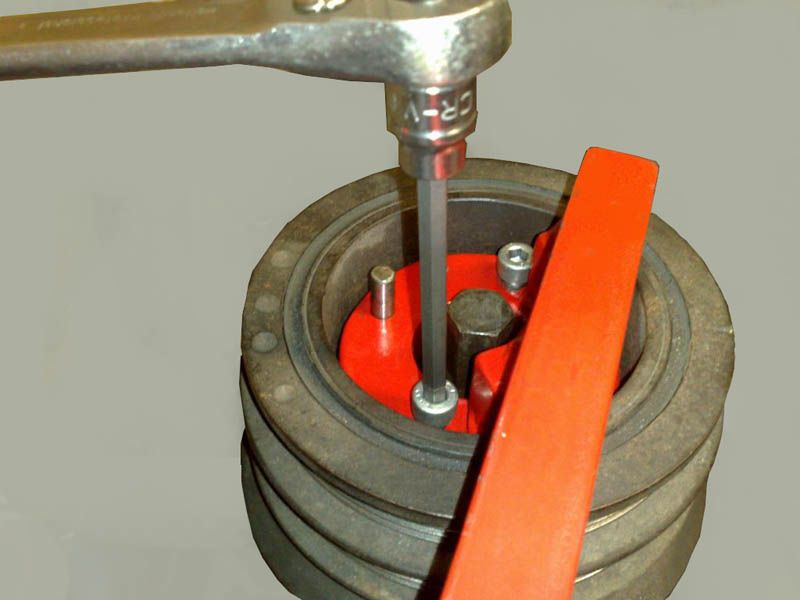
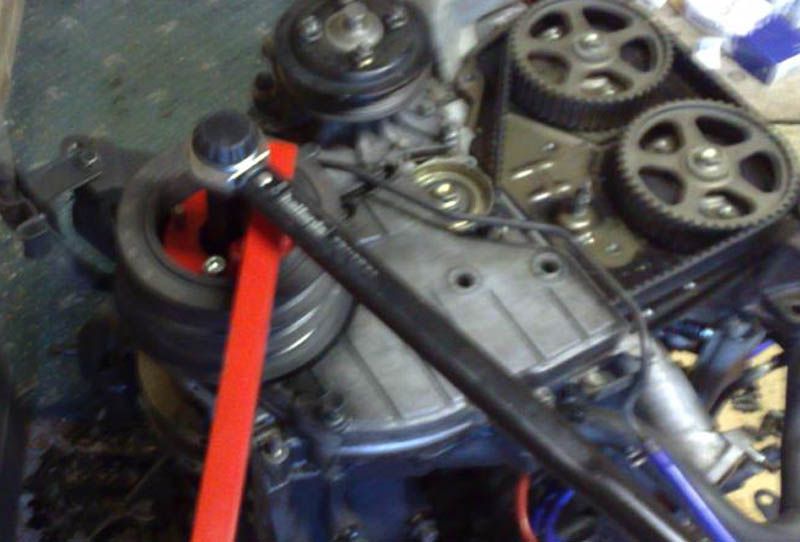
A few more photos Paul, I agree there must be an easer way to fabricate a pulley tool. The bottom photo looks similar to your suggestion. Did you say you where in the UK when we used farthings? you must have met Sherlock Homes.
|
|
|
|
|
03-20-2009, 02:06 AM
|
#18 |
|
Intake
Join Date: Oct 2008
Location: New Jersey
Posts: 36
|
The bolt size is M8 x 1.25
Bolt spacing tomorrow. |
|
|
|
|
03-24-2009, 08:18 PM
|
#19 |
|
Intake
Join Date: Oct 2008
Location: New Jersey
Posts: 36
|
Bill: I made some measurements on the crank pulley. Here's what I got:
clearance hole for M8x1.25 bolt = 0.308 inches bolt hole center-to-center spacing = 1.832 inches ("A" on your drawing) bolt center circle diameter = 2.585 inches I'm going to lay it out on my steel plate tomorrow and drill it. Let you know if it fits. Paul |
|
|
|
|
03-25-2009, 04:23 PM
|
#20 |
|
Intake
Join Date: Oct 2008
Location: New Jersey
Posts: 36
|
 OK, this and a 5 foot piece of pipe worked:  I jambed a concrete block and a block of wood underneath the plate, and while the front end lifted a few inches, the bolt broke free. I think the plate can double as a puller . . . going to try to slide a traditional threaded puller under the plate and try to push it off. |
|
|
|
 |
|
|
 Similar Threads
|
||||
| Thread | Thread Starter | Forum | Replies | Last Post |
| 1980 Supra Crank Pulley (Harmonic Balancer) | steve6163 | Non-Generation Specific Questions | 7 | 06-18-2010 01:47 AM |
| Crank Pulley Removal | go.stfu | MKIII Supra | 4 | 07-12-2007 11:16 PM |
| crank shaft pulley puller | supramacist | MKIII Supra | 30 | 04-18-2007 02:27 AM |
| Main pulley removal. | Kuban | MKIII Supra | 17 | 03-19-2007 07:04 AM |
| Crank shaft pulley.. | MA70_858 | Non-Generation Specific Questions | 3 | 07-28-2006 04:47 PM |


 Linear Mode

