|
|
 09-12-2009, 08:21 PM
|
#1 |
|
AEM EMS
Join Date: Jul 2006
Location: UK
Posts: 891
 |

The dipstick tube that’s protrudes into the sump was a very tight fit, the external tube that I think your referring to was very loose, I think there’s an O ring on the bottom of it, I just smeared some silicon sealant over the O ring a pushed it in, that was 2 years ago. No sign of a leak so far. If you are referring to the dipstick, then the only thing it could be is the rubber part at the top has shrunk slightly, there are products that will rejuvenate rubber seals to make them soft such as windscreen wipes etc, cant say I've ever used them though.
|

|

|
|
09-13-2009, 04:50 PM
|
#2 |
|
3" Exhaust
Join Date: Aug 2009
Location: Southern Oregon Coast
Posts: 83
|
Dipstick
Thanks Bill UK. I am going to pull it out and have another look - it dosn't seem right. The problm is it in between the Engine mount bracket so it not easy to get too.
|
|
|
|
|
09-13-2009, 04:57 PM
|
#3 |
|
3" Exhaust
Join Date: Aug 2009
Location: Southern Oregon Coast
Posts: 83
|
Timing Belt
Installing the timing belt on a Supra is much easier then a 4-Runner. The manual says to install the crank sprocket, lower timing cover and crank damper in order to see where TDC for number one cylinder is but I preferred to get the belt on and set up the timing with them off so I can see what is going on. Turns out that on the 90 Supra, all the marks are at 12 O’clock. Set both cam sprockets to 12 o’clock and the tab on the crank to 12 o’clock and you have it right. Wrap the belt around the crank sprocket and up to the left around the oil pump sprocket, pull tight, then around both cams and the idler pulley. Double check the marks again because they will move as the belt goes on. I had to do this three times till they were correct. Now put the spring on the idler and give the crank a few spins to see if the marks still line up. Tighten the idler bolt to 35 ft-pounds and spin the crank again. Loosen the idler bolt, wedge a large screw driver in to tighten up the belt tension and retourque the idler bolt and your done. Before I put the top timing cover on, I installed the distributor to get it set to Number 1 spark since I had the engine at TDC on the compression stroke. Water pump went on next and I’m making progress. |
|
|
|
|
09-13-2009, 05:04 PM
|
#4 | |
|
3" Exhaust
Join Date: Aug 2009
Location: Southern Oregon Coast
Posts: 83
|
dipstick
Quote:
After reading your post again - I see waht you were saying. I was referring tot he external support tube - not he actual dipsick with level marks. Sounds like yours was very loose too? I tried some RTV but still seems to move around quite easily. It just that if I do have a problem once the engine is back together - it going to real had to get to it. Is there some support clamp or somthing that keeps it from moving?? |
|
|
|
|
|
09-13-2009, 07:11 PM
|
#5 |
|
AEM EMS
Join Date: Jul 2006
Location: UK
Posts: 891
|
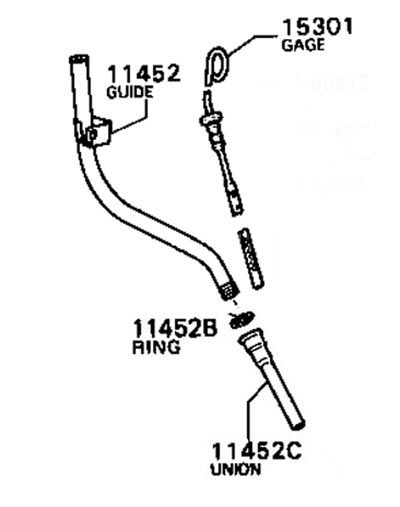
The 7M-GTE dipstick tube has a bracket which bolts onto the Turbo, not sure about the non turbo engine, I would have though it would be secured at some point, otherwise it would pull out when removing the dipstick.
|
|
|
|
|
09-13-2009, 09:01 PM
|
#6 |
|
AEM EMS
Join Date: Jul 2006
Location: UK
Posts: 891
|
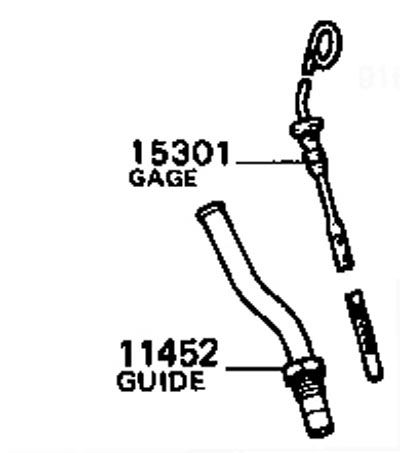
Looks like the non-turbo engine has a dipstick tube that screw into the bock with no support bracket.
|
|
|
|
|
09-15-2009, 06:28 PM
|
#7 | |
|
3" Exhaust
Join Date: Aug 2009
Location: Southern Oregon Coast
Posts: 83
|
Dipstick Problems
Quote:
I agree, the turbo dipstick is different then the NA. The turbo appears to come in 2 parts and is press fit into Block? With a bracket to keep it from moving in or out so all you need is a O ring? However, from this close-up of my NA dipstick – it does not have any threads and does not have any way to be secured. It inserts to the second level but still fits pretty loose and moves around even with a good amount of RTV. So I am wondering is there is some other type of adhesive I should be using here as RTV alone can not keep it secured. When I pulled it out - it was in there very tight. |
|
|
|
|
|
09-15-2009, 06:34 PM
|
#8 |
|
3" Exhaust
Join Date: Aug 2009
Location: Southern Oregon Coast
Posts: 83
|
I am not pulling the head
Ran into my first major mistake on the reassembly so far. I thought I could fit this U shape water pipe around the block and firewall with the head ON – NOPE! CAN”T BE DONE.
I am not going to take the head off after the 4+ hours in getting it on. SO I cut the pipe in part that fits behind the head and put a piece of hose and clamps. Still pretty hard to secure the clamps behind the head but was only 30 minutes and not a head removal. I point this out so anyone can know – install the water pipe before the head - it will be a lot easier. |
|
|
|
|
09-15-2009, 08:46 PM
|
#9 |
|
Intake
Join Date: Sep 2009
Location: Powell, Wyoming
Posts: 32
|
oh wow thats a valuble tip right there haha well it all looks great so far. Hope it turns out good. Still can't get over how clean your block and head look!!
STICKY!!!!!!!!!!!!!!!!!!!!!!!!!!!!!!!!!! 
__________________
1987 supra turbo 5speed. Great condition...sept the damn head gasket...but im working of that 
|
|
|
|
|
11-25-2009, 11:42 PM
|
#10 |
|
3" Exhaust
Join Date: Nov 2009
Location: Castro Valley, CA
Posts: 248
|
oh another question. your block too a week in the machine shop....
but what about the head? |
|
|
|
 |
| Thread Tools | |
| Display Modes | |
|
|
 Similar Threads
|
||||
| Thread | Thread Starter | Forum | Replies | Last Post |
| Replace or Rebuild a 7mge | cbrewster | MKIII Supra | 2 | 03-19-2009 10:20 PM |
| 7MGE Engine Rebuild | SilenceboneSupra | MKIII Supra | 1 | 10-23-2007 06:45 PM |
| PLEASE help newbee with engine rebuild | canadian mole | MKIII Supra | 4 | 06-17-2007 01:01 AM |
| New Engine Or Rebuild Help ! ! ! ! ! | DarkRaiderz | MKIII Supra | 5 | 01-23-2006 01:21 AM |


 Hybrid Mode
