 11-17-2010, 06:37 AM
|
#11 |
|
Stock
Join Date: Sep 2010
Location: Tulsa, Ok
Posts: 22
 |
Use and cleaning for wool pads:
One of the next products you'll need for your wool pads is a buffer spur.  This is what you use to clean your wool pads while you're buffing. You can pick one up for about $5.oo-6.oo USD, so there's no excuse for stabbing the pad with a screwdriver to clean it out. This is a quick way to destroy some pads, and downright dangerous. Watch how fast a wool pad spinning at 3000 rpm on a high-torque motor can sling something, and you'll understand. Your buffer spur is also essential to breaking in a new pad when you buy it. You can't use them right out of the box or you, your car, and everything nearby will look like a chia pet. The yarn on a new pad is very thick and fluffy, and it will throw copius amounts of fuzz everywhere. you'll need to wash and spur the pad several times before you can buff with it. Spurring the pad: Place the buffer against your leg with the pad facing away from you. With your machine set at 3000 rpm, pull the trigger and place the spur against the face of the pad so the wheels spin with the pad itself. This should basically look like the needle arm on a record player, for those of you old enough to remember what they looked like. Run your spur across the pad face from inside to outside edge until the pad stops throwing dust. Your pad will get gummed up with your polishing products while you use it, so you'll do this several times while buffing a car. Now you know how it's done... You can wash your pads in the washing machine on the gentle cycle with normal detergent, but it has a tendency to warp them. A warped pad doesn't stay on the backing plate very well. For this reason, I hand wash pads in the driveway. Use your hose, a stiff brush and a bucket of soapy water. Dunk the pad, scrub it and rinse it well. Repeat a few times when breaking in a new pad. Let's say you've buffed with it already on a red car. Now your white wool pad is pink. Spray it down while it's still dry with your 50/50 degreaser mix, then wash it. Drying pads is the fun part, cause they hold a lot of water. Start by tossing the pad (wool side up) like a frisbee up and down your driveway. This knocks out excess water. Do this until it quits leaving wet rings on the pavement. Now attach it back onto your buffer and spur the pad to remove the remaining water. Yes, you'll get a little wet doing this...suck it up. Once the pad stops misting, set it out in the sun to finish drying. On a warm day this should only take about an hour. This is why you want to have at least 2 of each pad type you use. NEVER put a buffer pad in the dryer...EVER. Last edited by Jackalope501; 11-17-2010 at 07:29 AM. |

|

|
|
11-17-2010, 07:42 AM
|
#12 |
|
Stock
Join Date: Sep 2010
Location: Tulsa, Ok
Posts: 22
|
Foam Pads:
These are glazing pads. They are also color-coded to reflect their abrasive levels, but pay attention because the colors are reversed here. Yellow foam pads are more abrasive "cutting pads".  White foam is a fine finish pad. 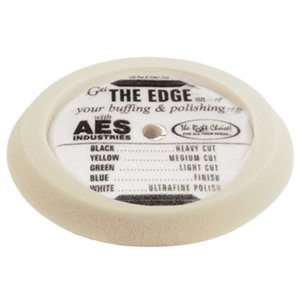 Now you'll notice on the back of this white pad they put a color-coding chart on here. This is why I chose this photo. This is supposed to be the standard, but it's not always accurate. The white and yellow foam pads are consistent in their cut ratings, but the other colors are not. It's always a good bet to check the packaging and talk to the sales rep when buying blue, green or black pads. You see here that the black pad is rated for "heavy cut" from this manufacturer. I have 2 black pads in my shop that are softer than my white ones. See my point? Cleaning foam pads is also different. Toss them in a sink of warm soapy water and massage them. Don't use hot water or get too violent with them...the velcro is attached to the foam with adhesive. They can be a bit fragile. Rinse them in cold water, squeeze out the excess and set them out to dry. Instead of spurring them like your wool pads while you're buffing, use a damp terrycloth towel on the pad face while you spin it at 1800 rpm. Last edited by Jackalope501; 11-17-2010 at 07:59 AM. |
|
|
|
|
11-17-2010, 08:36 AM
|
#13 |
|
Stock
Join Date: Sep 2010
Location: Tulsa, Ok
Posts: 22
|
Now that we've talked about the pad types, let's discuss how to use them. Yes, there is a big difference between buffing and glazing, and you don't always need to do both. For basic principles, let's define them both.
Buffing: Here we're spinning a wool pad with a more aggressive product to remove oxidation and scratches from the paint at higher rpms. Normally 3000. Buffing products have different levels of silicates (sand) in them to accomplish this. Heavy compounds will feel gritty between your fingers like toothpaste, while products like Malco's Lite Finish will have more of a hand lotion type consistency. Glazing: Now we're spinning a foam pad at lower rpms, around 1800, with a wax or polymer based product to seal the paint, remove swirl marks and/or enhance the shine on the car's finish. The buffer speed combined with the material of the pad produces heat that's used to break down the product and push it into the paint. Buffing products break down at higher heat than the glazing products do, which is why we glaze at lower speed settings. When to buff or glaze? Let's say your paint feels dry to the touch. You put your hand on the hood palm down and pull it to you and it sounds like this...eeeeeeeeeeeeeee. But the paint isn't oxidized or scratched up. Glazing it will do. Glazed and waxed paint will feel soft, warm and smooth. If you have oxidation(chalky appearance) and scratches in the paint, it's time to buff. The standard rule of thumb is this...if you can prick the scratch with your fingernail, you won't get all of it out. I've compounded deep scratches out of cars before, but you're gonna burn through some layers of paint to do it. Not something for an inexperienced person to attempt. Buffing creates a lot of heat and friction, so burning the paint is easy to do. You can destroy a car's finish quickly if you don't know what you're doing, which is why I recommend you start by glazing until you get the hang of it. Everybody burns cars while buffing. Anybody who says they haven't has never buffed. Two types of burns: Working burns- These occur due to failing paint or clearcoat, or around sharp body panels where the paint is extremely thin. One simple pass can do it, and you won't notice it until the damage is done. Oops, now you gotta fix it... Neglect burns- These occur due to an idiot with the buffer who stays too long in one place, or grinds the edge of the pad against the paint. An example would be buffing around a spoiler and bumping the pillar with the edge of the pad. That's why we do those areas by hand, and you always mask rubber body trim. Now it's time to fire somebody... Now here's where it gets complex. Let's say we've got a dark green Chevy truck to work on. Fairly common color for them, right? It's got some oxidation and a few fine scratches. We can buff this out with Lite Finish and a wool pad, wax it, and be done. Next we have a dark green Nissan truck with the same problem. Once we buff it out with Lite Finish and a wool pad, we'll have to glaze it with a foam pad and Phase II glazing product before we can wax it. Why? Because GM uses a harder clearcoat than Nissan and other auto makers do. Softer clearcoats are prone to swirl marks after you use a wool pad on them, especially with darker colors. Lexus black is a bitch. We'll cover that more later... Tomorrow I'll start covering buffing and glazing products... Last edited by Jackalope501; 11-17-2010 at 08:51 AM. |
|
|
|
|
11-17-2010, 02:31 PM
|
#14 |
|
Stock
Join Date: Sep 2010
Location: Tulsa, Ok
Posts: 22
|
Buffing Products:
There are hundreds of products out there making all kinds of claims, so let's boil off the fat and use what really works. From a professional standpoint I use Malco products like Lite Finish:  Lite Finish is the product I use on most buffing jobs. Combined with a wool pad, this will whack out most paint imperfections like oxidation and scratches. You can buy this stuff in several sizes, so I don't recommend the gallon unless you have a shop. You can get pints and quarts. A pint will do most cars used corerctly. (with an applicator) CAUTION! Do NOT store buffing products in a cold garage! Once they freeze, they separate...then the shit is worthless. Protect your investment by keeping them in a warm place. Ok, so you may not have access to Malco products, what then?  Meguiars makes some pretty good stuff as well, and you can get it anywhere. They also make heavier compounds, but this is the one we'll compare to Malco's Lite Finish. If you have to go heavier because Lite Finish or Meguiars isn't pulling it out of your paint, then these are our options... Meguiars Heavy Cut Cleaner:  Or what I use myself, Malco's Tru-Grit:  Also available in several sizes...gallons are for shops. Honestly, I'm almost reluctant to advise on these products to anyone without buffing experience, but we'll cover more on that as we go. Suffice it to say this shit can do some serious damage to paint if you use it incorrectly, but it pulls out shit you would not believe. Last edited by Jackalope501; 11-19-2010 at 10:13 PM. Reason: Addition of more info |
|
|
|
|
11-17-2010, 04:43 PM
|
#15 |
|
3" Exhaust
Join Date: Oct 2010
Location: kansas
Posts: 166
|
OMG this is like the bible for detailing. can wait to get back home and start on mine.

__________________
Nice 87 Supra, Pearl white, targa top, 5 spd, 7mgte  ARMY STRONG !! La fiebre Boricua Puerto Rico!!! 
|
|
|
|
|
11-18-2010, 07:06 AM
|
#16 |
|
Stock
Join Date: Jun 2010
Location: California
Posts: 9
|
By far the best detailing advise ive ever read up on. i worked at a detail shop for a year, but never got to do much with exterior. thank you again for this awesome contribution.
|
|
|
|
|
11-19-2010, 09:41 PM
|
#17 |
|
Stock
Join Date: Sep 2010
Location: Tulsa, Ok
Posts: 22
|
You're welcome...just trying to help guys. So much bullshit info out there makes it hard for people to get the right stuff...
Scroll back guys, I'm finishing out the post on buffing products above... Let's start using your buffer.... Remember wetting and wringing out our applicator pad for waxing? Same process here. Wet and squeeze your applicator for applying your buffing product. It's also a good idea to shake up your products too...not just when you buff, but you want to agitate it a bit whenever you walk past it on the shelf. Keep it from settling or separating on ya... Area coverage: You can only work a 2ft x 2ft (approximate)area on the car at one time. to give you a better idea, let's use a Supra hood as an example. You have 3 distinct areas from one side to the other divided roughly in 3rds. Your 2 lower laying sides and the raised section in the center, right? Now take each one of those and cut it in half from the hood's front edge at the nosecap to the base of the windshield. That "1/6th" of the hood is all the area you can manage at once. (Let me know if you need pics here to demonstrate) Buffing products are designed to be applied wet, and worked while wet. Don't let them dry like you do wax. Don't delay once you apply product to the hood. If your pad needs cleaned, spur it first...have the buffer ready to go once you put the product on... Since we've already mentioned the hood, let's start there. This is one of the easier parts of a car to buff. I recommend starting on one of the outside "3rds" of it here for easier control. (Once you've practiced a bit, you'll typically start at the center section and work out to avoid touching the same area twice.) Be sure to drape your buffer's cord over your shoulder so you're not dragging it on fenders, etc. While I'm on that, never wear anything harder than sweats when you buff a car. No brass rivots on your jeans, no belt buckles, NOTHING that can scratch the car! Sweats are always your safest bet. Trust me, you're gonna be getting intimate with your car here and leaning all over it. Last edited by Jackalope501; 11-20-2010 at 09:55 PM. |
|
|
|
|
11-20-2010, 10:10 PM
|
#18 |
|
Stock
Join Date: Sep 2010
Location: Tulsa, Ok
Posts: 22
|
You have your dampened applicator and buffing product in hand. Place about a quarter-sized dollop on the applicator, and wipe it on the 1/6th area we talked about earlier. Set your applicator aside (face up) and grab your buffer. (wool pad attached, 3000 rpm) Pull your trigger and set the buffer down flat on the surface you're buffing...moving side to side with the body lines of the hood, then back and forth to cross your patterns like a big "T". Keep your buffer moving at all times. Work this area until the surface comes out clean. Don't overdo it. You may leave a couple of small smut marks where you didn't get all the polish off...that's ok. Better to leave a couple of spots than attempting to grind them out.
Be particularly careful around windshield wipers, washer jets, trim, antennas, etc. the edges of your wool pad can snag one in a heartbeat and sling it across your shop. I'm not kidding. I've seen fuel doors, trim, rearview mirrors and hood ornaments ripped off of cars before. It happens in a nanosecond, so always be aware of your pad's proximity to hazards. Practice that for a bit, and we'll pick up again later... |
|
|
|
|
11-22-2010, 05:09 AM
|
#19 |
|
Stock
Join Date: Sep 2010
Location: Tulsa, Ok
Posts: 22
|
Ok, so here it is...the wife's "new" car. The body was straight as a pin and I was able to pick it up for $300.oo (minus the motor). This is what the paint looked like after the trailer ride home. The grasshopper on the hood came with the car...actually made the whole trip home with us.
 Kinda nasty looking huh?  You can see here where I started on the passenger side of the hood with a wool pad and Lite Finish. Look at the same image below with our coverage areas I mentioned earlier drawn out on the hood...  These sections are not numbered in the order you need to do them, it's just to show how many areas you need to break the hood down into for buffing one section at a time.  And this is what the hood looks like after the first pass with Lite Finish. That's 23 year old paint you're looking at. Hell of a difference isn't it? Black is one of the most difficult colors to buff out, because it shows EVERYTHING you didn't get right. White is also a pain in the ass, since you can't see the product you apply to the paint. This makes it hard to tell what you're doing and where you have or haven't been. To solve this, I always keep a few "ketchup" bottles in the shop. You'll notice one in section 5 of the layout picture above. If you're buffing white paint, put some of your product in the ketchup bottle along with a little food coloring. Blue or red works best. Don't worry...it won't stain your paint, but it will make your polish stand out for better visibility. So it may be a bit more difficult to work on, but black is also a high payoff color. Get it right and it looks like new money. The only color that pays off better is red. This is why I always kept my little red sport coupe parked in front of the shop. Buffed out red glows like nothing else can, and red is also a very forgiving color to buff. Oh, in case you were wondering...  The grasshopper is doing just fine. He stayed to watch me buff out the first half of the hood, now he's taken up residence in my yard somewhere. Last edited by Jackalope501; 11-22-2010 at 05:57 AM. Reason: Additional content |
|
|
|
|
11-22-2010, 05:49 AM
|
#20 |
|
Stock
Join Date: Jun 2010
Location: California
Posts: 9
|
Awesome stuff. Are you also going to give some of your experience on interior care, and engine decorating?
__________________
*95 Toyota Supra *08 Yamaha YZF-R6 |
|
|
|
 |
|
|
 Similar Threads
|
||||
| Thread | Thread Starter | Forum | Replies | Last Post |
| Current Ride, Mustang 5.0 | cageceo | Show n Tell | 28 | 08-10-2007 08:15 PM |
| Car Paint Maintenance, and cleaning. | cageceo | Exterior , Interior, and Detailing | 1 | 08-09-2007 05:43 AM |


 Linear Mode

