 09-12-2009, 07:00 PM
|
#17
|
|
3" Exhaust
Join Date: Aug 2009
Location: Southern Oregon Coast
Posts: 83
|
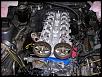
 Head Install
Ready for the head. So I read through the directions for the STUDS and put them finger tight into the block. I had read it would be difficult to get he head on with the rear studs so I leave them out.
Now, what is wrong with this picture?
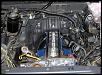 The answer is it is impossible to put the head on with the studs in the block. I dont difficult I mean impossible even with a single stud.
Oh you can place the head on over the studs you just cant put the washers on afterwards. Once the studs stick up through the head it is impossible to place the washes on - just not enough clearance.
The trick is to not install the studs first. You should test fit them to be sure the treads are clear and they all seat at the same (correct) height but remove them.
Place the down on the block as normal. I coated both sides of the gasket with copper spray adhesive. And dont forget to put the bead of RTV on the front of the block between the timing cover assembly and the head as documented in the manual.
Next, starting from the Middle and sequencing out as described in the manual for head boat tighten sequence, place the washer on the end of the stud and then lube the other end with the ARP assembly lube before adding the nut. I threaded the nut down all the way and back out to be sure the lube got all over the threads. And yes, there is enough lube in the packet to do all the studs so no need to skimp. Check to be sure the hex socket is on the nut end of the stud. Now with the washer on the block end of the stud, place them on the head. The washer will not go down at first but you can slide the stud left or right to clear the head bosses and get the washer to fall into place then get the stud into the hole. Now use the hex driver to secure the stud finger tight. Next you just use a deep 12 point 14 mm socket (3/8 drive and ? is too big) to tighten down the already installed nut. I tried to place the nut on the stud after inserting the stud but its just too hard to get it in there with dropping into the head and having to fish it back out. Much easier to just put the nut on first.
I then sequence tighten the stud nuts to 90 pounds as the ARP instruction said. Took 5 passes but they all torque very smoothly.
Took me 4 hours to put the head on but that was because I had to figure this all out. Now that I know what to do it can be done in under an hour.
The answer is it is impossible to put the head on with the studs in the block. I dont difficult I mean impossible even with a single stud.
Oh you can place the head on over the studs you just cant put the washers on afterwards. Once the studs stick up through the head it is impossible to place the washes on - just not enough clearance.
The trick is to not install the studs first. You should test fit them to be sure the treads are clear and they all seat at the same (correct) height but remove them.
Place the down on the block as normal. I coated both sides of the gasket with copper spray adhesive. And dont forget to put the bead of RTV on the front of the block between the timing cover assembly and the head as documented in the manual.
Next, starting from the Middle and sequencing out as described in the manual for head boat tighten sequence, place the washer on the end of the stud and then lube the other end with the ARP assembly lube before adding the nut. I threaded the nut down all the way and back out to be sure the lube got all over the threads. And yes, there is enough lube in the packet to do all the studs so no need to skimp. Check to be sure the hex socket is on the nut end of the stud. Now with the washer on the block end of the stud, place them on the head. The washer will not go down at first but you can slide the stud left or right to clear the head bosses and get the washer to fall into place then get the stud into the hole. Now use the hex driver to secure the stud finger tight. Next you just use a deep 12 point 14 mm socket (3/8 drive and ? is too big) to tighten down the already installed nut. I tried to place the nut on the stud after inserting the stud but its just too hard to get it in there with dropping into the head and having to fish it back out. Much easier to just put the nut on first.
I then sequence tighten the stud nuts to 90 pounds as the ARP instruction said. Took 5 passes but they all torque very smoothly.
Took me 4 hours to put the head on but that was because I had to figure this all out. Now that I know what to do it can be done in under an hour.
 Now it on to the timing stuff.
|

|

|